| De opmaak van je hele document (bijvoorbeeld van paragraaf, koppen en tabellen) kun je in één keer voor alle document templates vastleggen met behulp van een stylesheet. Een stylesheet is een document met code waarin zaken zoals kleur, lettertypen, font formaat, wel of niet dik gedrukt staan ingesteld. |
|
|
Openen. |
|
De stylesheet(s) vind je via menu-groep 'Werkproces' (1) en menu-item 'Documenttemplates' (2). Klik op de drie puntjes (3). | 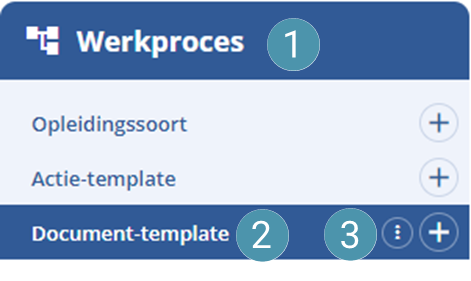 |
Klik op menu-item 'Stylesheets'.
|  |
| De inhoud van de stylesheet staat in CSS (Cascading Style Sheets) geschreven, een van de vele programmeertalen die er zijn. We snappen dat dit geen gesneden koek voor je is. Daarom hebben wij alvast een standaard versie voor je klaar gezet en hieronder uitgelegd zodat je dit eenvoudig zelf kunt bewerken. |
| Let op: voor document templates gemaakt met editor 3.0 heb je een aparte stylesheet nodig, de stylesheets voor document templates gemaakt met editor 2.0 zijn anders ingericht. Ga je beginnen met het werken in de nieuwe editor? Zorg er dan eerst voor dat je de stylesheet voor de nieuwe editor "Default3.0" opent en de opmaak goed zet. |
Tekst voor het gehele document. |
| In editor 3.0 kun je voor paragrafen, titels, etc. verschillende waarden definiëren. Hierdoor kun je makkelijk variëren in bijvoorbeeld lettertypes, fontformaat en kleur. Controleer of de lettertypen en het formaat overeenkomt tussen beide stylesheets |
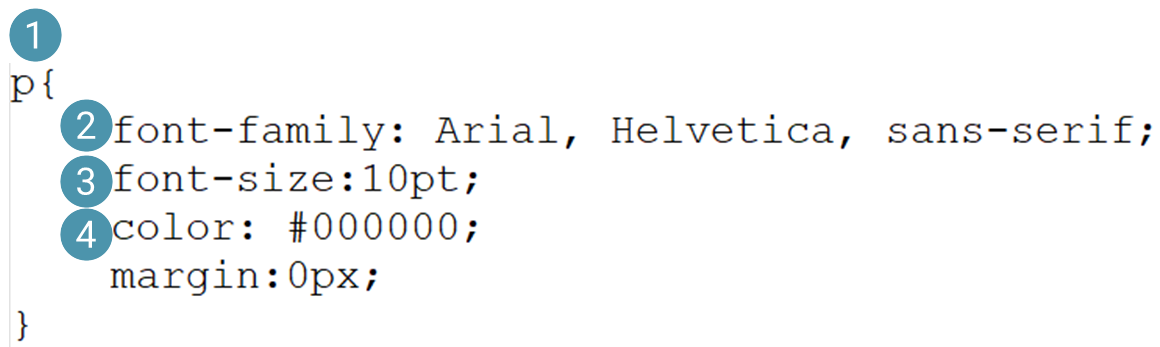
Paragraaf tekst. |
- Dit is de opmaak van de paragraaftekst.
- Font-family: lettertype, het eerste lettertype wordt standaard gebruikt. Bestaat dit lettertype niet op jouw pc? Dan wordt het tweede lettertype gebruikt etc.
- Grootte van het lettertype.
- Kleur van het lettertype via een hex. kleurcode. #000000 = zwart, #ffffff = wit.
|  |
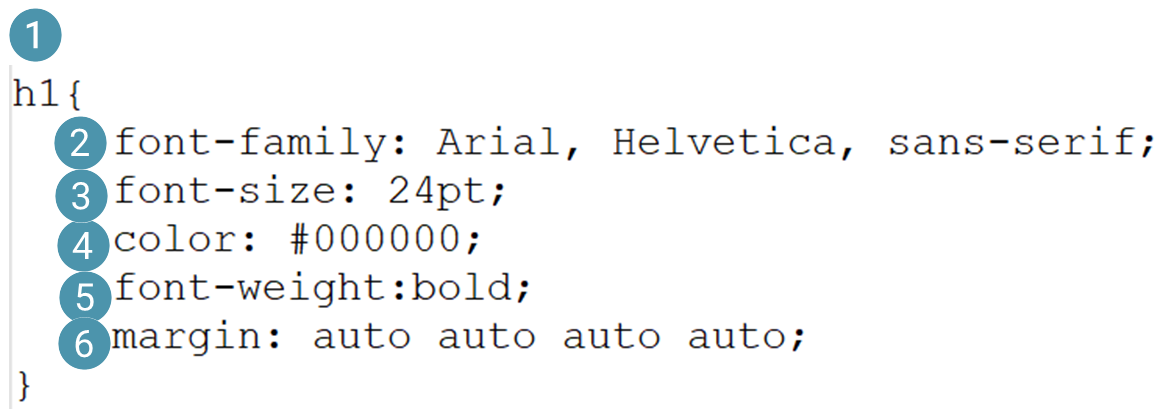
Koppen 1 tot en met 4. |
| Zoals je misschien wel weet kan je met HTML (de code van je document templates) verschillende koppen definiëren. H1 is kop 1 en H5 kop 5. In je stylesheets kun je alle koppen een aparte opmaak geven. Erg makkelijk om hiërarchie in je koppen aan te brengen. |
- h1 = kop 1.
- Meerdere fonts als 'fallback' systeem. Als de eerste niet ondersteund wordt, wordt de volgende font gebruikt.
- Grootte van het lettertype in (in pt of px).
- Kleur van tekst, zwart=#000000.
- Tekst gewoon (normal) of vet (bold) weergeven.
- Respectievelijk hoeveelheid ruimte boven - rechts - onder - links van de titel, anders vul in bijv: 0pt 0pt 0pt 0pt;
|  |
Opsommingstekens en nummering. |
| Ook opsommingen en nummering zijn veranderd in de nieuwe editor. Waar de oude editor marges in één parameter vastlegde, legt de nieuwe editor ze in 2 losse vast. Dit zie je in het voorbeeld uit het stylesheet hieronder. Geef hier voor je zelf de gewenste marges in die je wilt hanteren voor je lijsten. |
- Ongeordende lijst (bullits)
- Witruimte boven de lijst in pixels.
- Witruimte onder de lijst in pixels.
- Geordende lijst (nummers).
- Witruimte boven de lijst in pixels.
- Witruimte onder de lijst in pixels.
- Wanneer opsommingslijst items een andere opmaak nodig hebben, kun je dat hier ingeven.
|  |
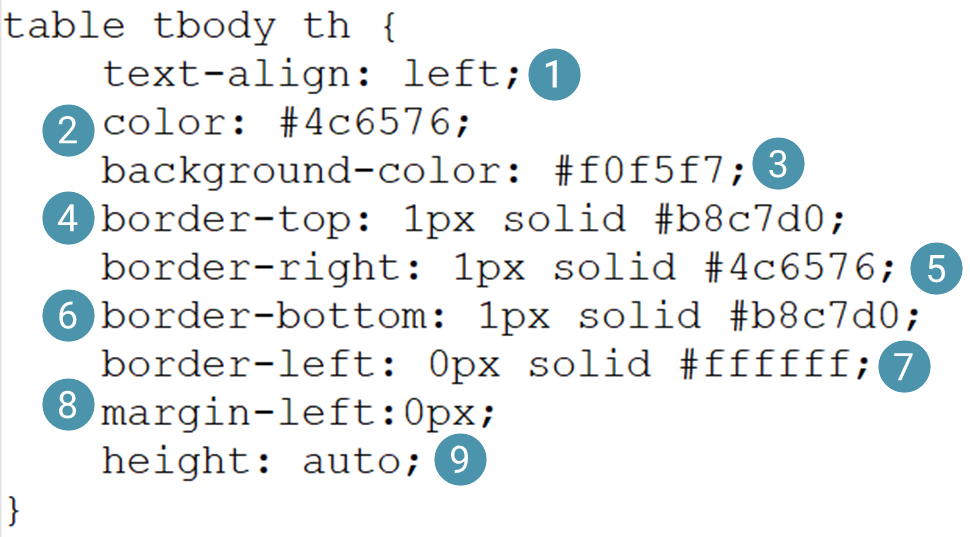
Tabellen: |
| Ook tabellen werken iets anders. Zo moet je de rand voor alle kanten los definiëren weer met HEX-kleuren. Dit geldt ook weer voor tekst- en achtergrond kleur. De hoogte blijft in de nieuwe stylesheet op auto staan, aangezien je dit in de editor zelf aanpast. De tabel opmaak is in drie componenten verdeeld. |
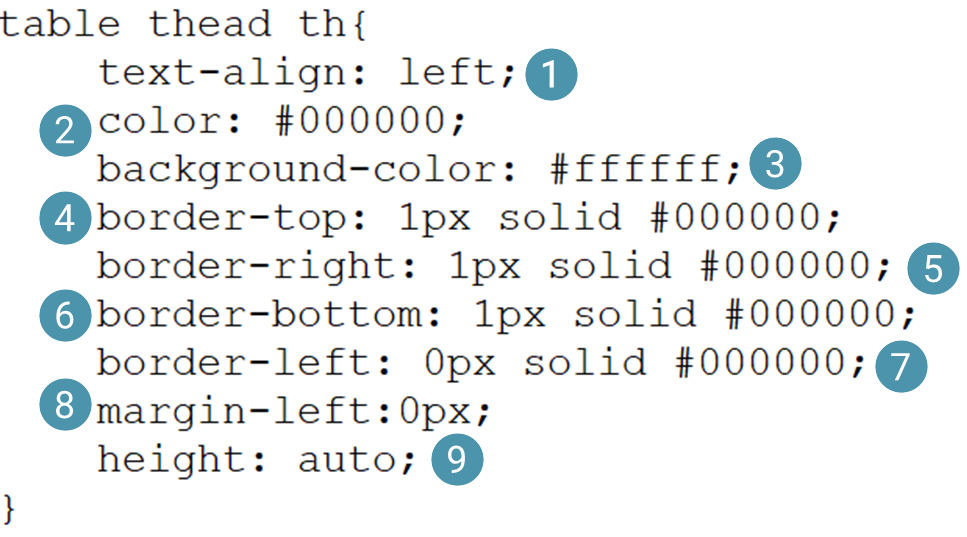
Component 1, de kopregel, verticaal weergegeven.- Standaard uitlijning van tekst.
- Kleur tekst in hex. waarde.
- Achtergrond kleur van de cel.L
- Lijn in dikte en kleur boven iedere cel.
- Lijn rechts in dikte en kleur van iedere cel.
- Lijn onder in dikte en kleur van iedere cel.
- Lijn links in dikte en kleur van iedere cel.
- Standaard afstand tussen tekst en linkerzijde van cel.
- Hoogte van de cel.
|  |
Component 1, de kopregel, horizontaal weergegeven.- Standaard uitlijning van tekst.
- Kleur tekst in hex. waarde.
- Achtergrond kleur van de cel.L
- Lijn in dikte en kleur boven iedere cel.
- Lijn rechts in dikte en kleur van iedere cel.
- Lijn onder in dikte en kleur van iedere cel.
- Lijn links in dikte en kleur van iedere cel.
- Standaard afstand tussen tekst en linkerzijde van cel.
- Hoogte van de cel.
|  |
Component 3, de regel(s) onder de koptekst.
- Standaard uitlijning van tekst.
- Kleur tekst in hex. waarde.
- Achtergrond kleur van de cel.L
- Lijn in dikte en kleur boven iedere cel.
- Lijn rechts in dikte en kleur van iedere cel.
- Lijn onder in dikte en kleur van iedere cel.
- Lijn links in dikte en kleur van iedere cel.
- Standaard afstand tussen tekst en linkerzijde van cel.
- Hoogte van de cel.
|  |
Bijgewerkt tot en met versie 86
