
Intro. Optiescherm. Dag. Week. Maand. Lijst. Tijdlijn. Onderdelenblok. Bundelen onderdelen. Opleiding maken & plannen. Onderdeel wijzigen. Docenten & locaties plannen. Zoeken & vinden. Opleidingen kleuren.
| In het dagoverzicht heb je een visueel overzicht van het lesrooster per dag. |
 |
Belangrijkste kenmerken van het scherm: | |
Zoek naar opleidingen / onderdelen:
|  |
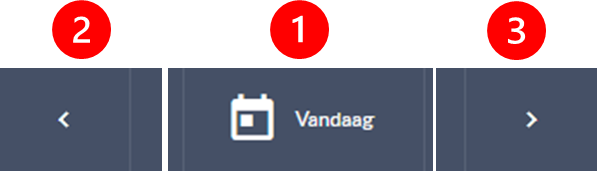
| De gekozen dag, met behulp van een van de pijltjes voor dag, maand of jaar kun je de gekozen dag wijzigen. | 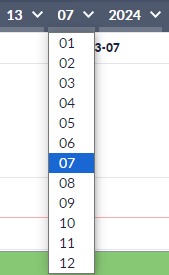 |
| Het weeknummer vind je linksboven in beeld. |  |
| Tijdbalk, de ingestelde werktijden worden altijd op het scherm getoond en worden zwart weergegeven. De tijden buiten werktijd worden grijs weergegeven. De werktijden kun je instellen via de tab 'Opties'. De rode driehoek geeft de huidige tijd aan en wordt als een rode lijn op het scherm getoond. |  |
Klik onderaan in de werkbalk op:
|  |
| Download de dag als CSV bestand. |  |
| Open het volledige planningsscherm in een nieuwe tab in jouw browser. Handig want je kunt nu tegelijkertijd in Coachview verder werken. |  |
Tip:
|  |
| Meer weten over opleidingssoortcategorieën? Klik dan hier opleidingssoort: categorieën | |
| Tip:klik hier en lees welke informatie het blok met onderdeelgegevens bevat. |
 |
Niet-beschikbaarheid: | |
| Heb je vakantiedagen toegevoegd in Coachview via 'Niet-beschikbaarheid' dan worden deze in het dag overzicht getoond. | |
 | |
| Het is mogelijk om uit te zoeken of voor een docent of locatie een niet-beschikbaarheid voor deze dag is opgegeven. | |
| Selecteer met behulp van de filter de docent(en) en/of locatie(s). |  |
| Is niet-beschikbaarheid opgegeven? Dan zie je dat als volgt weergegeven. | |
 | |
Exporteren van de dagplanning: | |
| Klik op het pijltje rechtsonder in het scherm. |  |
|  |
Bijgewerkt tot en met versie 99