Fysieke externe documenten, zoals bijvoorbeeld een PDF, Outlook Message, MS-Word of MS-Excel, kunnen bij een specifiek dossier geüpload worden. Denk daarbij aan bijvoorbeeld de getekende presentielijst die je bij een opleiding wilt uploaden, huiswerkopdrachten bij een opleidingssoort of offertes bij een aanvraag. Het is mogelijk om meerdere bestanden tegelijkertijd te uploaden. De bestanden worden op de Coachview server bewaard.
|
|
Coachview detecteert van tevoren of het aan eisen zoals bestandsgrootte en formaat voldoet.- De bestandsgrootte mag niet meer dan 10 mb zijn.
- Alleen de volgende extensies zijn toegestaan: .bmp,.csv,.doc,.docm,.docx,.dot,.dotx,.eml,.gif, .htm, .html, .ics,.jfif,.jpe,.jpeg,.jpg,.mht,.msg, .numbers, .ods, .odt, .oft, .one,.pages,.pdf,.png, .potx, .ppsx ,.ppt, .pptx, .rtf, .tif, .tiff ,.txt, .vsd, .vsdx, .wpd,.xls,.xlsb,.xlsm,.xlsx,.xlt,.xml,.xps, .xsd,.zip
Het is ook mogelijk om clouddocumenten te uploaden. Wil je meer weten? Klik hier en lees hoe je een clouddocument kunt uploaden en bewerken. |
|
Casus upload een huiswerkopdracht en koppel deze aan de uitnodiging naar de deelnemer. |
| Uploaden huiswerkopdrachten: |
| Open een opleidingssoort en klik op de tab 'Documenten' |
Klik op de knop 'Upload'.
- Datagroep: geeft aan waar je de documenten gaat uploaden (bijvoorbeeld bij een persoon, bedrijf, opleiding, aanvraag of opleidingssoort).
- Item: geeft aan bij welk dossier, in dit voorbeeld de opleidingssoort TCV , je de documenten upload.
- Leesrechten: als je dit leeg laat kunnen alle gebruikers van Coachview de documenten openen en lezen. Met behulp van gebruikersrollen kun je dit beperken.
- Schrijfrechten: als je dit leeg laat kunnen alle gebruikers de documenten openen en verwijderen. Met behulp van gebruikersrollen kun je dit beperken
- Selecteer een bestand: upload een fysiek document.
- Integraties: het document is ook zichtbaar als je deze dossiers opent.
|  |
Klik op de knop 'Selecteer een bestand' of de pijl om documenten toe te voegen. Er wordt een dialoogvenster (de Windows/Apple verkenner) geopend waarmee je naar de plek kunt navigeren waar je documenten staan. |
- Je kunt nu één document selecteren door er met de linker muistoets 2x op te klikken of
- je klikt op het eerste document, houdt de shift-toets ingedrukt en klikt op het laatste te importeren bestand of
- je klikt op een document, houdt de ctrl-toets ingedrukt en klikt per keer op een ander document.
|
| Klik in het Windows/Apple dialoogvenster op de knop 'Openen' en de geselecteerde documenten worden getoond. |
| Geselecteerde documenten worden grijs weergegeven en kunnen geüpload worden. | 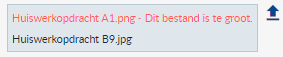 |
| Geselecteerd bestand wordt rood weergegeven en kan niet geüpload worden omdat deze te groot is. In dit geval moet je opnieuw de documenten selecteren. |
| Klik op de knop 'Opslaan'. Je ziet kort een voortgangsbalk. Als het uploaden is gelukt dan keer je terug naar het tabblad 'Documenten'. Het type van de beide huiswerkopdrachten in de lijst is 'extern'. |
|
| Koppel huiswerkopdrachten aan uitnodiging deelnemer: |
- Open via menu 'Werkproces' en menu-item 'Document-template' de lijst met documenttemplates.
- Klik op de naam van de documenttemplate die gebruikt wordt om de uitnodiging naar de deelnemer te sturen.
- Klik in tab 'Algemeen' op de knop 'Bewerken'.
- Ga naar het panel 'Bijlage(n) koppelen en klik op het vergrootglas bij 'Bestaand in- of extern document'.
- Het pop-upscherm met interne en externe documenten wordt geopend.
- Vul de naam of een gedeelte van de naam van de geüploade documenten in en klik op 'Zoeken'.
- Selecteer de te koppelen documenten en klik op 'Toevoegen'.
- Klik op 'Opslaan' de bijlagen zijn gekoppeld en worden automatisch toegevoegd aan de e-mail.
|
|
Wijzigen van een geüpload bestand: |
In Coachview kun je een extern document niet direct wijzigen. Je moet het bestand eerst downloaden en dan bewerken. Dit doe je zo:- Open het dossier waar het bestand is toegevoegd.
- Ga naar de tab 'Documenten'.
- Klik op de naam van het bestand.
- Klik bij 'Extern document' nogmaals op de naam.
- Het bestand wordt gedownload en kan bewerkt worden.
|
Het bewerkte document voeg je zo toe:- Klik op 'Bewerken'.
- Selecteer met de pijl het bewerkte document.
- Klik op 'Opslaan'
|
|
Verwijderen van een geüpload bestand: |
- Open het dossier waar het bestand is toegevoegd.
- Ga naar de tab 'Documenten'.
- Klik op de knop 'Bewerken'.
- Selecteer een of meerdere geuploade bestanden.
- Klik op 'Verwijdeen' en op 'OK'.
Heb je het bestand aan een of meerdere documenttemplates gekoppeld dan kan deze niet verwijderd worden voordat je deze ontkoppelt. |
